Demonstration on efficient, parallel Execution of EasyVVUQ with QCG-PilotJob Manager on local and HPC resources (a step-by-step guide)
Preface
In this tutorial, you will get a step-by-step guidance on the usage of several VECMAtk components to perform uncertainty quantification calculations within a local and HPC execution environment. A simple numerical model that simulates the temperature of a coffee cup under the Newton’s law of cooling is provided here as an example application, but the general scheme of conduct can be practiced in any application. To show that, we will also discuss the usage of VECMAtk to quantify uncertainties in a multiscale fusion application. In this tutorial you will learn about the following VECMA software components:
- EasyVVUQ - a Python3 library that aims to facilitate verification, validation and uncertainty quantification,
- QCG-PilotJob - a Pilot Job system that allows to execute many subordinate jobs in a single scheduling system allocation,
- EasyVVUQ-QCGPJ - a lightweight integration code that simplifies usage of EasyVVUQ with a QCG-PilotJob execution engine,
- QCG-Client - a command line client for execution of computing jobs on the clusters offered by QCG middleware,
- QCG-Now - a desktop, GUI client for easy execution of computing jobs on the clusters offered by QCG middleware.
Contents
Introduction
As the performance of supercomputers becomes more powerful, it also turns into a driving force for the science and engineering communities to construct computational models of higher complexities. These models can help explore sciences that were previously restricted by the computing powers of older-generation computers. However, are these complex computational models reliable? Are their calculations comparable to experimental measurements? Any simulation model, regardless of its level of complexity, becomes more robust if verified, validated, and minimized on uncertainties. Hence, uncertainty quantification becomes one of the central objectives in computational modelling. As defined in the VECMA glossary [1] , uncertainty quantification UQ is a “discipline, which seeks to estimate the uncertainty in the model input and output parameters, to analyse the sources of these uncertainties, and to reduce their quantities.” However, this process can quickly become cumbersome because just a few uncertain inputs could require hundreds or even thousands of samples. Such a number of tasks cannot be performed effectively without (1) adequate computational resources, (2) a dedicated approach and (3) specialised programming solutions.
In light of the aforementioned increase in availability of computing power, there is also an increase in operating cost of large data centers. Therefore, more emphasis must be placed on developing the appropriate mechanisms and solutions that enable effective execution of calculations and yet follow the administrative policies of the resource providers. Therefore, to address the requirements of UQ analysis and technological concerns we have integrated EasyVVUQ with QCG-PilotJob Manager in the VECMAtk to offer users a complete solution for performing highly intensive UQ studies on the HPC resources of peta- and in the future exa-scales. This solution allows users to submit the entire workflow as a single job into a HPC cluster and thus avoids the limitations and restrictions imposed by the administrative policies of resource providers. Inside the resource allocation created for a single job, QCG-PilotJob Manager deals with the execution of a potentially very high number of subjobs in an automatic, flexible and efficient way. Although QCG-PilotJob Manager is designed to support execution of complex computing tasks on HPC clusters, it can also be used on a local computer, allowing users to conveniently test their execution scenarios prior to the actual production runs using the same programming and execution environment.
The tutorial is structured as follows: first, we provide a description to a simple numerical model that serves as an example application in the tutorial, then we provide instruction on how to install the EasyVVUQ-QCGPJ component of the VECMAtk and other essential software tools. The tutorial materials download information is also included. Next, we provide a glimpse into the structure of EasyVVUQ-QCGPJ workflow, followed by instructions into the configuration on environment-specific settings. Then, we showcase 4 different approaches (local, SLURM, QCG-Client, and QCG-Now) you can choose from to execute EasyVVUQ on the sample application, all under the management of the QCG-PilotJob. For any reader who is interested in learning more about UQ applied to a multiscale workflow, a section describing the fusion model is positioned at the end of the tutorial.
Notice 1: The tutorial contains some steps related to the execution of EasyVVUQ / QCG-PilotJob task via queuing system and/or QCG access tools. To follow these steps you must have an account with a computing cluster controlled by SLURM and if you want to use QCG tools it has to be part of the QCG infrastructure. In order to get access to Eagle cluster at Poznan Supercomputing and Networking Center, which is available with Slurm and QCG, please drop an e-mail with a short motivation to VECMA infrastructure’s leader - Tomasz Piontek: piontek_at_man.poznan.pl.
Application model for the tutorial
To give readers a sense of how EasyVVUQ-QCGPJ works, we provide a simple cooling coffee cup model as a test application throughout the entire tutorial. This allows users to quickly grasp the concept behind the model so they can put their attention towards the functionality of EasyVVUQ with QCG-PilotJob, and how the toolkit assists users with the process of UQ on their numerical model. In reality, many types of numerical codes can also benefit from EasyVVUQ with QCG-PilotJob. Multiscale fusion modeling, for example, uses the same software to apply UQ. To learn more about the multiscale fusion model and how the toolkit helps in quantifying uncertanties, please refer to the last section of the tutorial.
The sample physics model in this tutorial is inspired by the “cooling coffee cup model” from [2]. A cup of coffee is placed inside some environment of temperature Tenv. Consequently, the cup of coffee experiences heat loss and its temperature T varies in time t, as described mathematically by the Newton’s law of cooling:
dT(t)/dt=-K(T(t) - Tenv),
where K is a constant that describes the system. The python script cooling_model.py, which is provided as part of the tutorial materials, takes the initial coffee temperature T0, K and Tenv and solve the above equation to find T. Since there are uncertainties to the inputs K and Tenv, the goal is to take the uncertain inputs into consideration when obtaining the probability distribution of the measured value T. Please note that, from this point forward, all quantities will be mentioned without explicit units.
We begin the UQ calculations to the model by defining lower and upper threshold values to a uniform distribution for both uncertain inputs:
0.025 <= K <= 0.075, and
15.0 <= Tenv <= 25.0.
The initial coffee temperature T0 is set to be 95.0, and the calculation runs from t=0 to t=200. At the end of the simulation, we defined two extra parameters Te and Ti, with Te identically equal to T and Ti identically equal to -T. We select the Polynomial Chaos Expansion [3] PCE method with 1st order polynomial, which would result in (1 + 2)2 or 9 sample runs. A python script is provided in the tutorial material “test_cooling_pj.py”, showcasing how EasyVVUQ-QCGPJ takes the input parameters and handle all sample calculations in an efficient manner, and provides statistical analysis to the outputs T(t) (i.e. mean, standard deviation, variance, Sobol indices [4]). Here is a schematic depicting the entire UQ procedure described above.
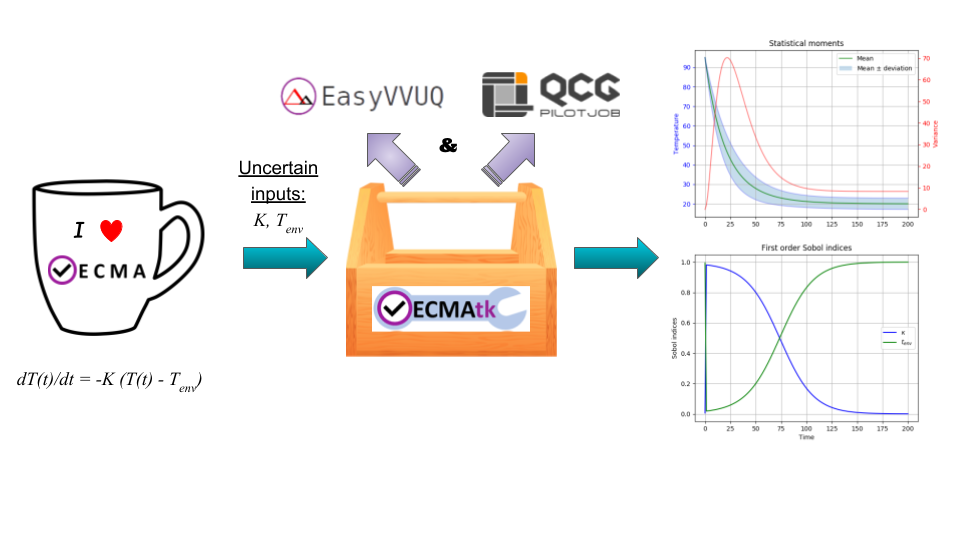
UQ of the cooling coffee cup model: the EasyVVUQ-QCGPJ of the VECMAtk takes the uncertain inputs and produces statistical analysis to T(t). The plots on the right are the calculated average temperature, standard deviation, and variance (top plot); and the first order Sobol indices for the uncertain input parameters K and Tenv (bottom plot).
The rest of the tutorial will guide you through the toolkit installation and execution of this model. Before “running test_cooling_pj.py”, please be sure to check all parameters and make changes accordingly.
Installation of EasyVVUQ-QCGPJ
If you are going to work remotely on a cluster, please login into access node and start an interactive SLURM job (we are doing it on Eagle cluster, which is a part of the VECMA testbed).
$ ssh user@eagle.man.poznan.pl
$ srun -n 1 --time=2:00:00 --partition=plgrid --pty /bin/bash
Be sure that Python 3.6+ and pip 18.0.1+ are installed and available in your environment. In case of Eagle cluster use the module for the newest version of the python.
$ python3 -V Python
3.6.6
$ module load python/3.7.3
$ python3 -V Python 3.7.3
Add
~/.local/binto your$PATHenvironment variable (if it is not yet already there) and make it permanent by updating the.bashrcfile.$ export PATH=/home/plgrid/user/.local/bin:$PATH $ echo 'PATH=/home/plgrid/user/.local/bin:$PATH' >> .bashrc
Check if virtualenv is installed on your system and if not install it.
$ virtualenv --version
bash: virtualenv: command not found
$ pip3 install --user virtualenv
Collecting virtualenv
  Downloading https://files.pythonhosted.org/packages/ca/ee/8375c01412abe6ff462ec80970e6bb1c4308724d4366d7519627c98691ab/virtualenv-16.6.0-py2.py3-none-any.whl (2.0MB)
    100% |████████████████████████████████| 2.0MB 2.0MB/s
Installing collected packages: virtualenv
  The script virtualenv is installed in '/home/plgrid/user/.local/bin' which is not on PATH.
  Consider adding this directory to PATH or, if you prefer to suppress this warning, use --no-warn-script-location.
Successfully installed virtualenv-16.6.0
$ virtualenv --version
16.6.0
Create virtualenv for the EasyVVUQ with QCG-PilotJob support:
$ virtualenv ~/.virtualenvs/easyvvuq-qcgpj
Using base prefix '/opt/exp_soft/local/generic/python/3.7.3'
New python executable in /home/plgrid/user/.virtualenvs/easyvvuq-qcgpj/bin/python3.7
Also creating executable in /home/plgrid/user/.virtualenvs/easyvvuq-qcgpj/bin/python
Installing setuptools, pip, wheel...
done.
Activate this virtualenv:
$ . ~/.virtualenvs/easyvvuq-qcgpj/bin/activate
(easyvvuq-qcgpj) user@e0192:~$
- Install EasyVVUQ, QCG-PilotJob and the EasyVVUQ-QCGPJ packages using pip3(Note: if you are not able to use pip in your environment you can always install all required packages manually as they are publicly available, e.g. by cloning repositories for missing packages and invoking python3
setup.py install for each one- take a look for the requirements here: https://github.com/vecma-project/EasyVVUQ-QCGPJ/blob/master/setup.py)(easyvvuq-qcgpj)$ pip3 install easyvvuq (easyvvuq-qcgpj)$ pip3 install qcg-pilotjob (easyvvuq-qcgpj)$ pip3 install easyvvuq-qcgpj
Getting the tutorial materials
Create directory for the tutorial
$ mkdir tutorial
The materials used in this tutorial are available in GitHub EasyVVUQ-QCGPJ repository. Get them with the following commands:
$ cd ~/tutorial
$ git clone https://github.com/vecma-project/EasyVVUQ-QCGPJ.git
$ cp EasyVVUQ-QCGPJ/tutorials/cooling_cup .
After invoking these commands all the tutorial files should be available in the
~/tutorials/cooling_cupfolder
Execution of EasyVVUQ with QCG-PilotJob
In this tutorial we describe 4 ways to execute EasyVVUQ with QCG-PilotJob:
- Local execution
- With SLURM
- With QCG-Client
- With QCG-Now
Each method has its own advantages and disadvantages. The local execution can be easily performed on a laptop and instantly provide an overview to users. The execution using SLURM, similar to the execution with QCG-Client, may be useful for those who are using queuing system on a daily manner. The execution with QCG-Now could be an interesting option for those who prefer GUI and the automatized access to resources.
In the rest of this tutorial, the overall structure of the EasyVVUQ-QCGPJ workflow is discussed before the step-by-step instructions are presented for each method of execution. The eventual choice of method should be based on the user’s preferences and requirements.
EasyVVUQ-QCGPJ workflow
The workflow constructed for uncertainty quantification of a cooling coffee cup is available in:
~/tutorials/cooling_cup/app/test_cooling_pj.py
Considerably simplified, it looks as follows:
def test_cooling_pj():

    # Set up a fresh campaign called "cooling"
    my_campaign = uq.Campaign(name='cooling', work_dir=tmpdir)

    # ...
    # Skipped code that initialises the campaign, sets up the application
    # and generates samples for the use-case.
    # ...

    # Create EasyVVUQ-QCGPJ Executor that will process the execution
    qcgpjexec = Executor(my_campaign)

    # Create QCG-PilotJob Manager with 4 cores (if you want to use all available resources remove the resources parameter)
    # Refer to the documentation for customisation options.
    qcgpjexec.create_manager(resources='4')

    # Define ENCODING task that will be used for execution of encodings using encoders specified by EasyVVUQ.
    # The presented specification of 'TaskRequirements' assumes the execution of each of the tasks on 1 core.
    qcgpjexec.add_task(Task(
        TaskType.ENCODING,
        TaskRequirements(cores=1)
    ))

    # Define EXECUTION task that will be used for the actual execution of application.
    # The presented specification of 'TaskRequirements' assumes the execution of each of the tasks on 2 cores,
    # but for more demanding, parallel applications the resources requirements may be extended to many cores or
    # even many nodes.
    # Each task will execute the command provided in the 'application' parameter.
    qcgpjexec.add_task(Task(
        TaskType.EXECUTION,
        TaskRequirements(cores=2),
        application='python3 ' + APPLICATION + " " + ENCODED_FILENAME
    ))

    # Execute encodings and executions for all generated samples
    qcgpjexec.run(processing_scheme=ProcessingScheme.SAMPLE_ORIENTED)

    # Terminate QCG-PilotJob Manager
    qcgpjexec.terminate_manager()

    # The rest of typical EasyVVUQ processing (collation, analysis)
We can distinguish the following key elements from this script:
- Typical initialisation of a Campaign and generation of samples.
- Instantiation of EasyVVUQ-QCGPJ Executor.
- Set up of the QCG-PilotJob Manager instance using the Executor’s
create_managermethod. - Definition of tasks for Encoding and Execution steps of EasyVVUQ that will be executed as QCG-PilotJob tasks. Each definition of task includes the specification of resource requirements that the task consume.
- Parallel processing of the encodings and executions with QCG-PilotJob
using a predefined scheme of processing (
ProcessingScheme). - Termination of QCG-PilotJob Manager using the Executor’s
terminate_managermethod. - The collation and analysis made in a typical way, unperturbed from the EasyVVUQ script.
What is worth stressing is the fact that both the presented workflow and
EasyVVUQ-QCGPJ’s API are generic enough such that the majority of
applications can either use the presented code directly, or make small
adjustments according to the specific needs of use cases. For example,
we can imagine that for some applications all encoding steps have to be
executed before the first execution step begins. In that case, the only
required modification is to change the value of ProcessingScheme from
ProcessingScheme.SAMPLE_ORIENTED to ProcessingScheme.STEP_ORIENTED.
Common configuration before execution
Please check and update if needed the content of environment configuration file located in:
~/tutorials/cooling_cup/app/eqi_conf.sh. This file is used to configure system-specific settings for the developed workflow. Once you open this file, make sure the appropriate environment modules are loaded and virtualenv is activated. Please also check if the settings related to the environment variables, particularlyCOOLING_APPandSCRATCHshouldn’t be adapted to the currently used environment. If this is the case modify them appropriately.Source the configuration file. Once sourced, it should activate virtualenv:
$ . ~/tutorials/cooling_cup/app/eqi_config.sh
(easyvvuq-qcgpj)$
Local execution
Be sure that you have sourced the
eqi_conf.shfile and are in the proper virtualenv.Go into the
~/tutorials/cooling_cup/local_execution:(easyvvuq-qcgpj)$ cd ~/tutorials/cooling_cup/local_execution
- Execute the workflow:(Note that for the local execution we are using a slightly modified version of the core workflow ((not from the
../appfolder)) - since we may test this workflow on a local computer without the queuing system allocation, we define 4 virtual cores to demonstrate how QCG-PilotJob Manager executes tasks in parallel. However, be aware: when Pilot Job Manager is started as an interactive task in the allocation created by Slurm, it will override the settings of virtual resources by the actually allocated real resources. Thus, in order to test parallel execution on a cluster, you need to allocate at least 2 cores for your interactive job. Be aware that the amount of allocated resources should be larger than the requirements of any of the tasks, otherwise the demanding tasks will be blocked in the queue).(easyvvuq-qcgpj)$ python3 test_cooling_pj.py
When processing completes, check results produced by EasyVVUQ.
Execution using SLURM
This execution is possible only on a cluster with the SLURM queuing
system. In this tutorial we assume that EasyVVUQ-QCGPJ has been
configured on the Eagle cluster in the way as described in the section
Installation of EasyVVUQ-QCGPJ and the tutorial files has been cloned
into the ~/tutorial/VECMAtk.
Go into the
~/tutorials/cooling_cup/slurm_execution$ cd ~/tutorials/cooling_cup/slurm_execution
Adjust the SLURM job description file:
test_cooling_pj.sh.Submit the workflow as a SLURM batch job:
$ sbatch test_cooling_pj.sh
Submitted batch job 11094963
You can check the status of your SLURM jobs with:
$ squeue -u plguser
             JOBID PARTITION     NAME     USER     ST     TIME  NODES NODELIST(REASON)
          11094963 fast          easyvvuq plguser  R      0:02  1     e0022OBID
Alternatively you can display detailed information for a concrete job:
$ sacct -j 11094963
       JobID    JobName  Partition    Account  AllocCPUS      State ExitCode
------------ ---------- ---------- ---------- ---------- ---------- --------
11094963     easyvvuq_+       fast   vecma2019          4  COMPLETED      0:0
11094963.ba+      batch              vecma2019          4  COMPLETED      0:0
11094963.0   .encode_R+             vecma2019          1  COMPLETED      0:0
11094963.1   .encode_R+             vecma2019          1  COMPLETED      0:0
11094963.2   .encode_R+             vecma2019          1  COMPLETED      0:0
11094963.3   .encode_R+             vecma2019          1  COMPLETED      0:0
11094963.4   .execute_+             vecma2019          1  COMPLETED      0:0
11094963.5   .execute_+             vecma2019          1  COMPLETED      0:0
11094963.6   .execute_+             vecma2019          1  COMPLETED      0:0
11094963.7   .encode_R+             vecma2019          1  COMPLETED      0:0
11094963.8   .execute_+             vecma2019          1  COMPLETED      0:0
11094963.9   .execute_+             vecma2019          1  COMPLETED      0:0
11094963.10  .encode_R+             vecma2019          1  COMPLETED      0:0
11094963.11  .encode_R+             vecma2019          1  COMPLETED      0:0
11094963.12  .encode_R+             vecma2019          1  COMPLETED      0:0
11094963.13  .execute_+             vecma2019          1  COMPLETED      0:0
11094963.14  .execute_+             vecma2019          1  COMPLETED      0:0
11094963.15  .execute_+             vecma2019          1  COMPLETED      0:0
11094963.16  .encode_R+             vecma2019          1  COMPLETED      0:0
11094963.17  .execute_+             vecma2019          1  COMPLETED      0:0
When the job completes, you can check the file
output[jobid].txt, in which you will find the output produced by EasyVVUQ.
Execution with QCG-Client
This execution can be performed only on a machine with QCG-Client
installed and configured to execute jobs on a cluster with SLURM queuing
system. In the tutorial we assume the usage of the QCG-Client installed
on qcg.man.poznan.pl and the Eagle cluster, which is a part of the
PLGrid infrastructure. These two machines share the same $HOME directory
where both EasyVVUQ-QCGPJ has been configured in the way described in
the section Installation of EasyVVUQ-QCGPJ and the tutorial files has
been cloned into the ~/tutorial/VECMAtk.
Login into the machine where qcg-client is installed:
$ ssh user@qcg.man.poznan.pl
Go into the
~/tutorials/cooling_cup/qcg_execution$ cd ~/tutorials/cooling_cup/qcg_execution
Adjust QCG job description file:
test_cooling_pj.qcg.Submit the workflow as a QCG batch job (you may be asked to provide your personal certificate credentials):
$ qcg-sub test_cooling_pj.qcg
Enter GRID pass phrase for this identity:
...
test_cooling_pj.qcg {}      jobId = J1559813849509_easyvvuq_pj_qcg_4338
You can list and check the status of QCG jobs with:
$ qcg-list
...
IDENTIFIER       NOTE  SUBMISSION     START   FINISH  STATUS   HOST  FLAGS  DESCRIPTION
J1559813849509_easyvv* 06.06.19 11:39                 PREPROCESSING
                                                               eagle S UP
A detailed information about the lastly submitted job can be obtained in the following way:
$ qcg-info
...
J1559814286855_easyvvuq_pj_qcg_5894 :
Note:
UserDN: ****
TaskType: SINGLE
SubmissionTime: Thu Jun 06 11:44:47 CEST 2019
FinishTime: Thu Jun 06 11:45:18 CEST 2019
ProxyLifetime: P24DT23H48M33S
Status: FINISHED
StatusDesc:
StartTime: Thu Jun 06 11:44:47 CEST 2019
Purged: true

Allocation:
HostName: eagle
ProcessesCount: 4
ProcessesGroupId: qcg
Status: FINISHED
StatusDescription:
SubmissionTime: Thu Jun 06 11:44:47 CEST 2019
FinishTime: Thu Jun 06 11:45:52 CEST 2019
LocalSubmissionTime: Thu Jun 06 11:44:52 CEST 2019
LocalStartTime: Thu Jun 06 11:45:02 CEST 2019
LocalFinishTime: Thu Jun 06 11:45:18 CEST 2019
Purged: true
WorkingDirectory: gsiftp://eagle.man.poznan.pl//tmp/lustre/plguser/J1559814286855_easyvvuq_pj_qcg_5894_task_1559814287294_978
When the job completes, the results are downloaded to
results[JOB_ID]directory.
Execution with QCG-Now
At this moment QCG-Now allows users to submit jobs to PLGrid clusters only, thus in order to use the tool, an account with PLGrid is mandatory. As before, we assume the usage of Eagle.
During the configuration you should select VECMA as a domain and then whenever QCG-Now asks about user ID/password you should provide your PLGrid credentials.
When installed and configured, the steps to submit an EasyVVUQ / QCG-PilotJob task from QCG-Now are as follows:
Get the tutorial files using GIT or download them zipped from https://github.com/vecma-project/EasyVVUQ-QCGPJ/archive/master.zip - then extract the files.
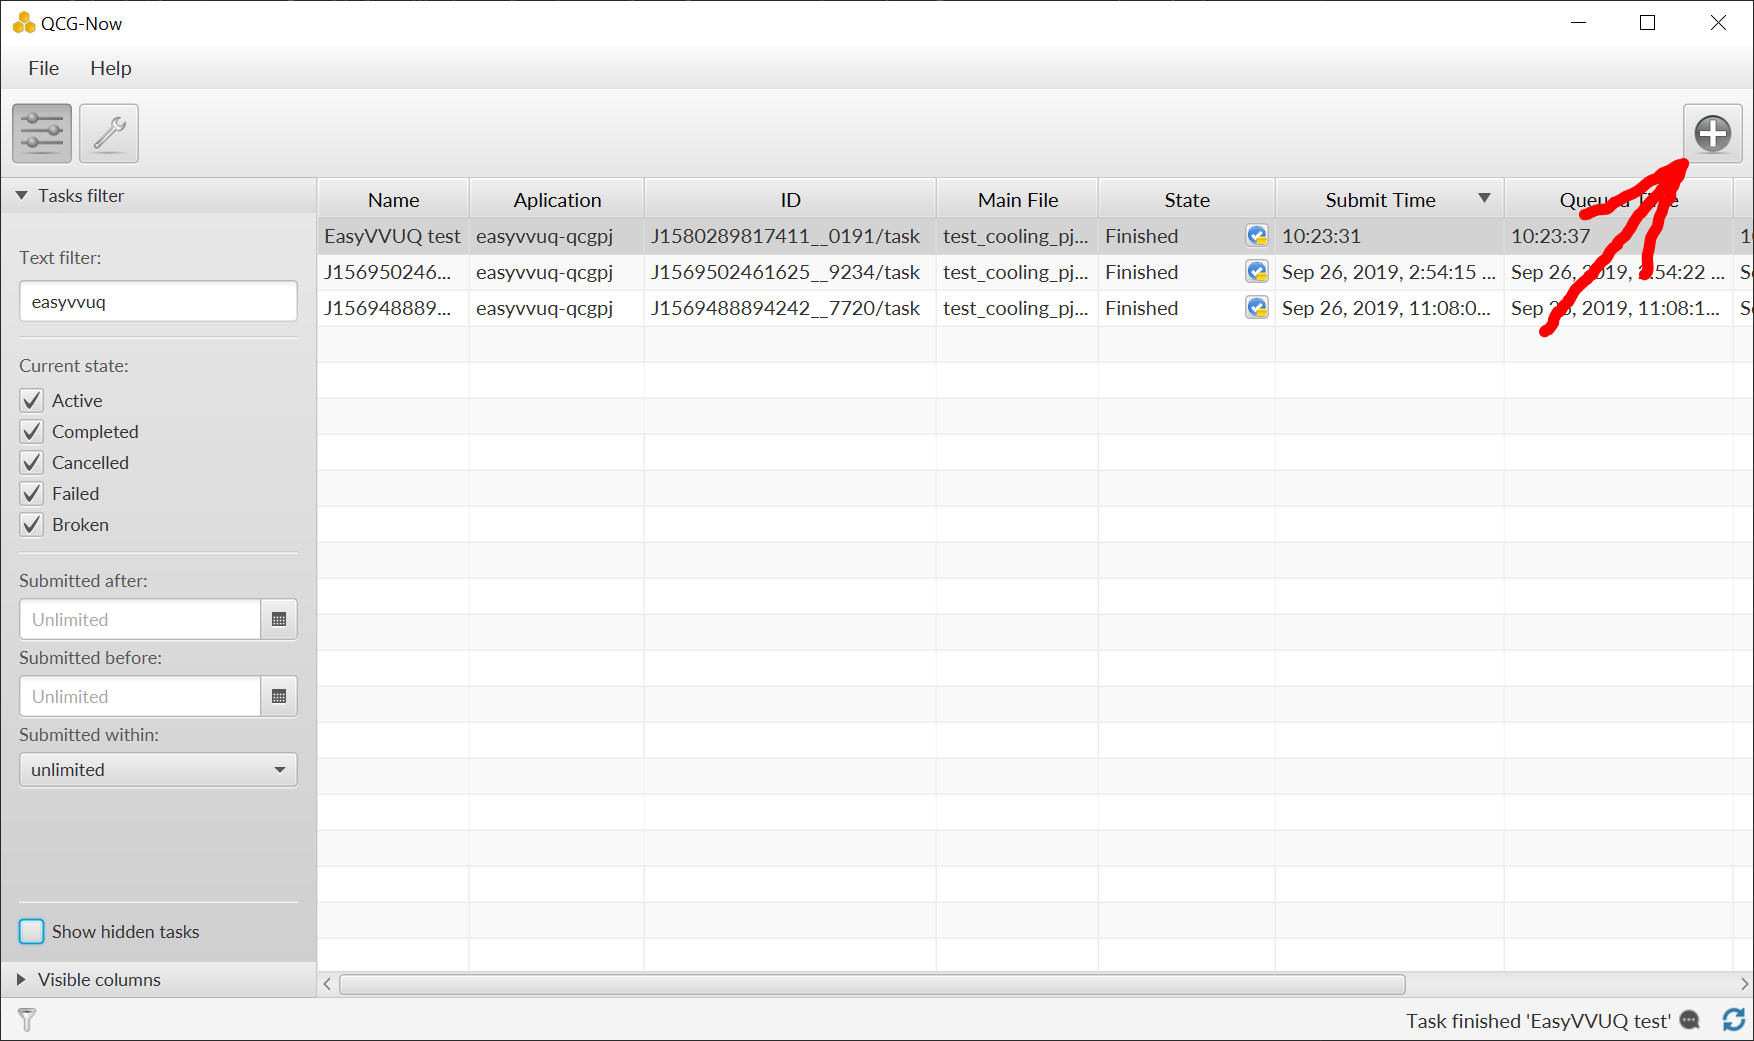
In the main window of QCG-Now click “+”
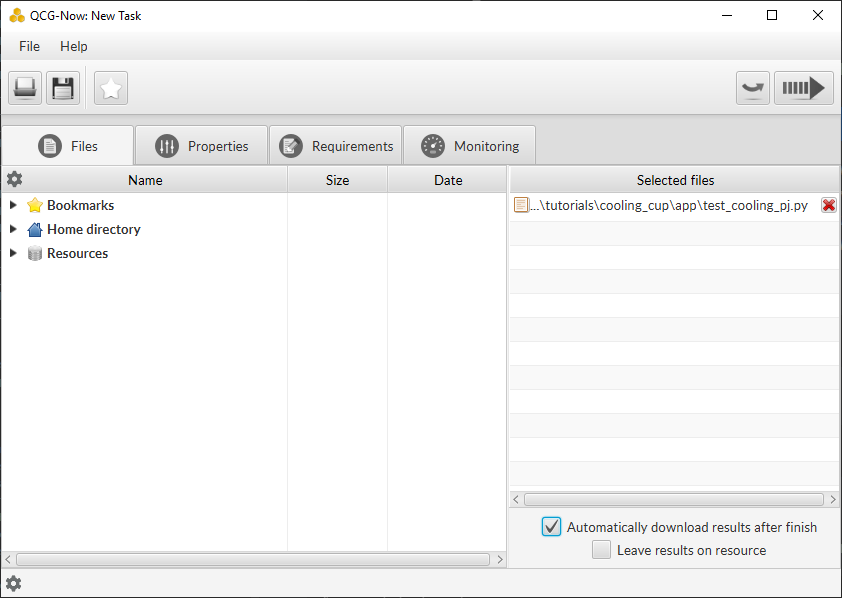
The New Task definition window should open. When you select the Files tab it should look as follows:
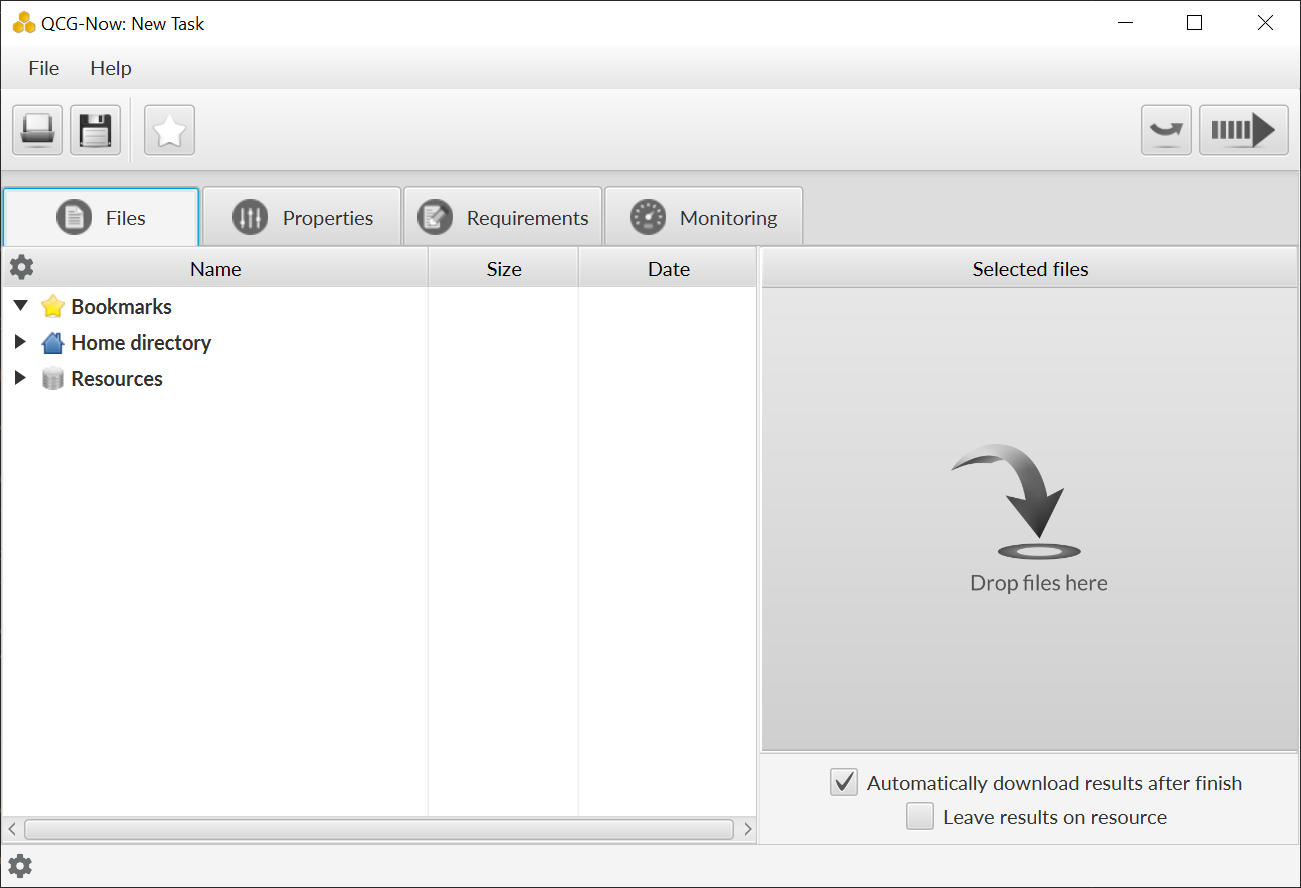
Drag&drop the /tutorials/cooling_cup/app/test_cooling_pj.py file from the extracted zip file into “DROP FILES HERE” space:
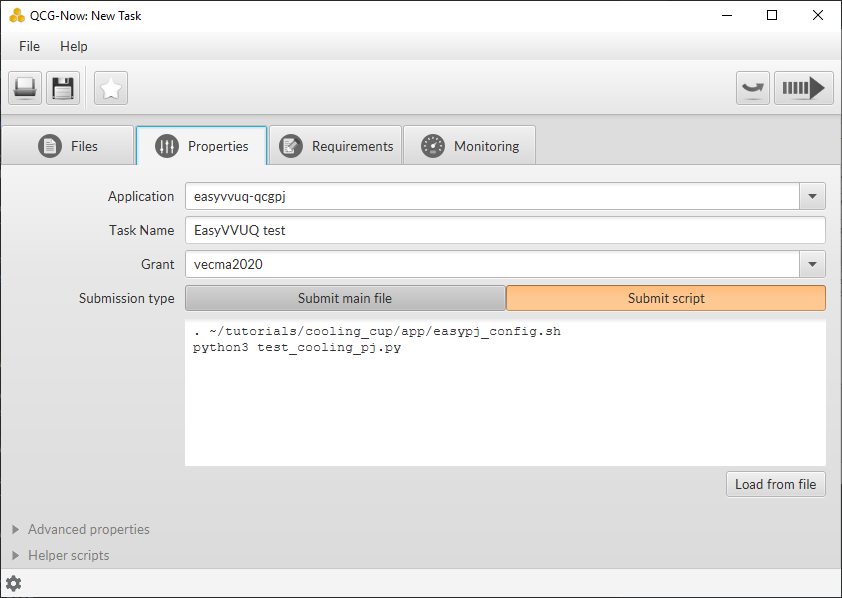
In the Properties tab select:
- Application: easyvvuq-qcgpj
- Task Name: EasyVVUQ test
- Grant: leave blank to use a default one or select another
- Submission type: Submit script
- In the opened textarea write:
. ~/tutorials/cooling_cup/app/eqi_config.sh
python3 test_cooling_pj.py
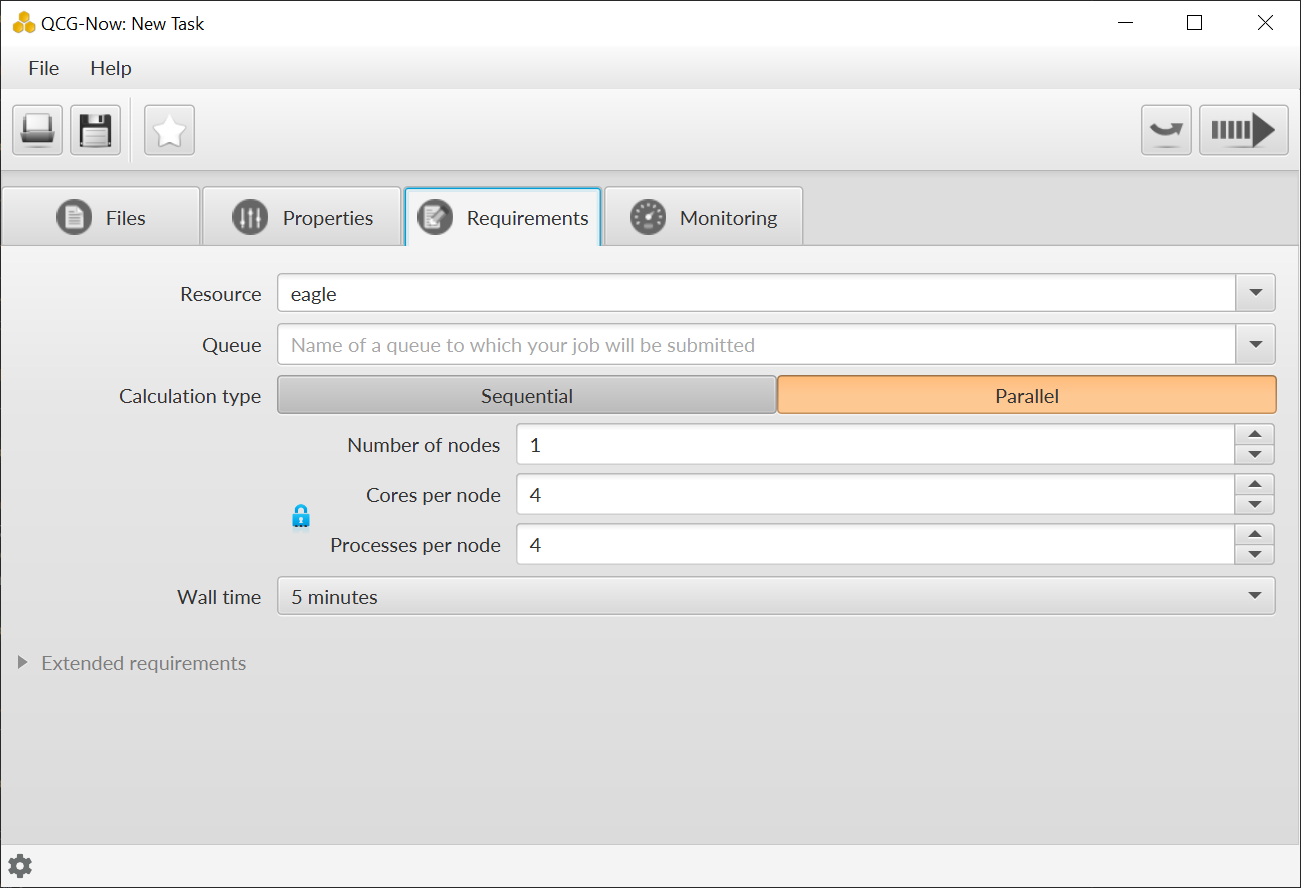
In the Requirements tab select:
- Resource: eagle
- Calculation type: Parallel (Number of nodes: 1, Cores per node: 4, Processes per node 4)
- Walltime: 5 minutes
Click the submit button (the arrow in the top-right corner). At this moment QCG-Now initiates a data transfer to the computing resources and requests the QCG middleware for the task execution.

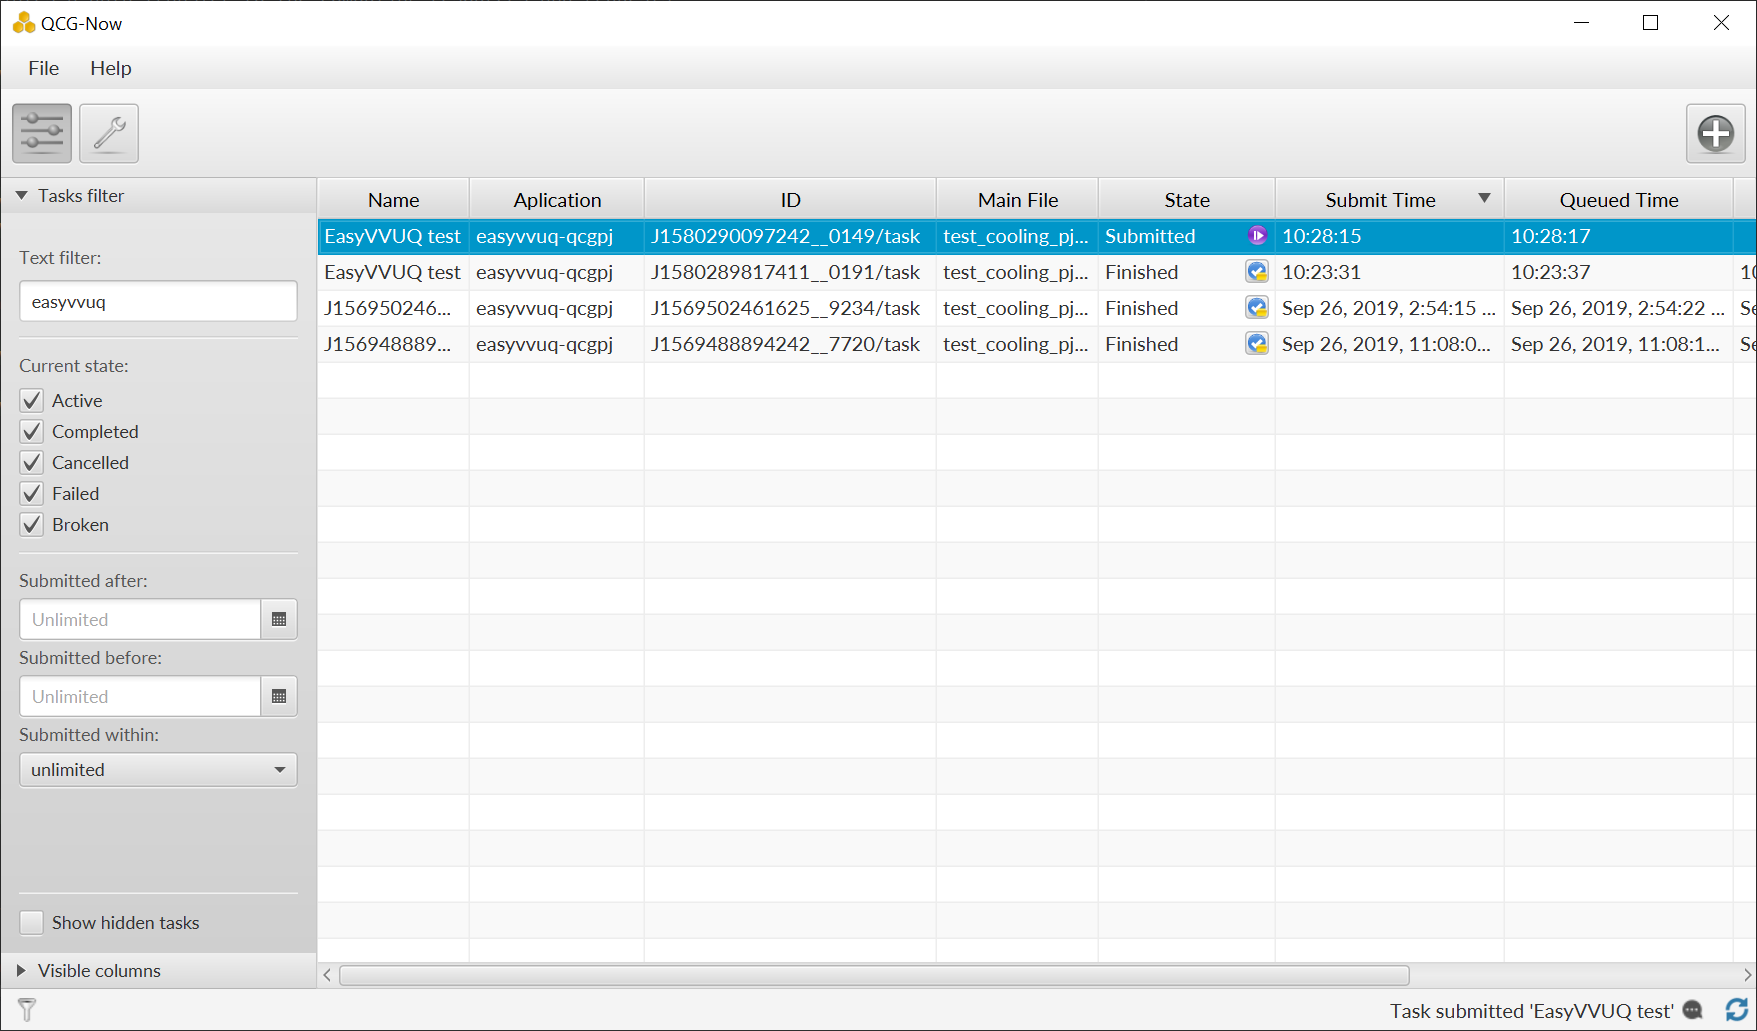
When submitted, the task is added to the list of tasks in the main window, where it is possible to track the state and progress of its execution in two complementary views:
The Tabular view:
The Task’s Details view:
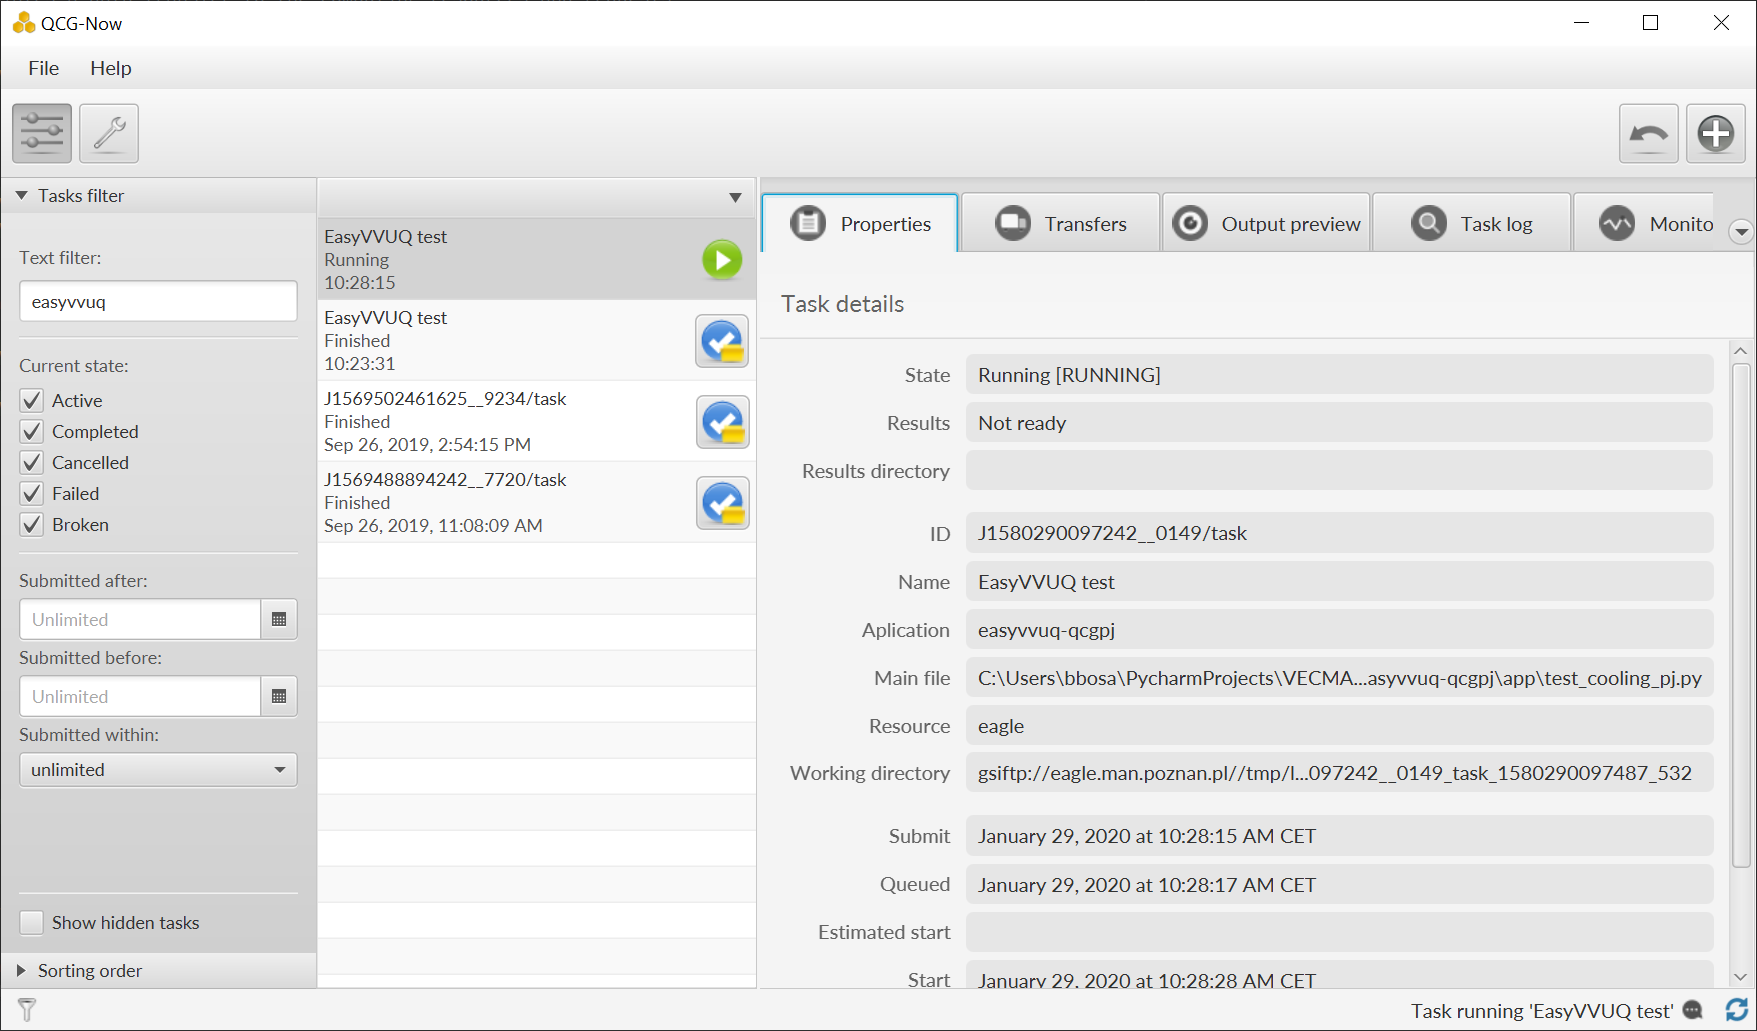
The views can be switched by double-clicking on a task.
- When the task completes successfully, the output data is transferred back to a user’s computer and user can open a directory with results using one of dedicated buttons from the main window.
 or
or 
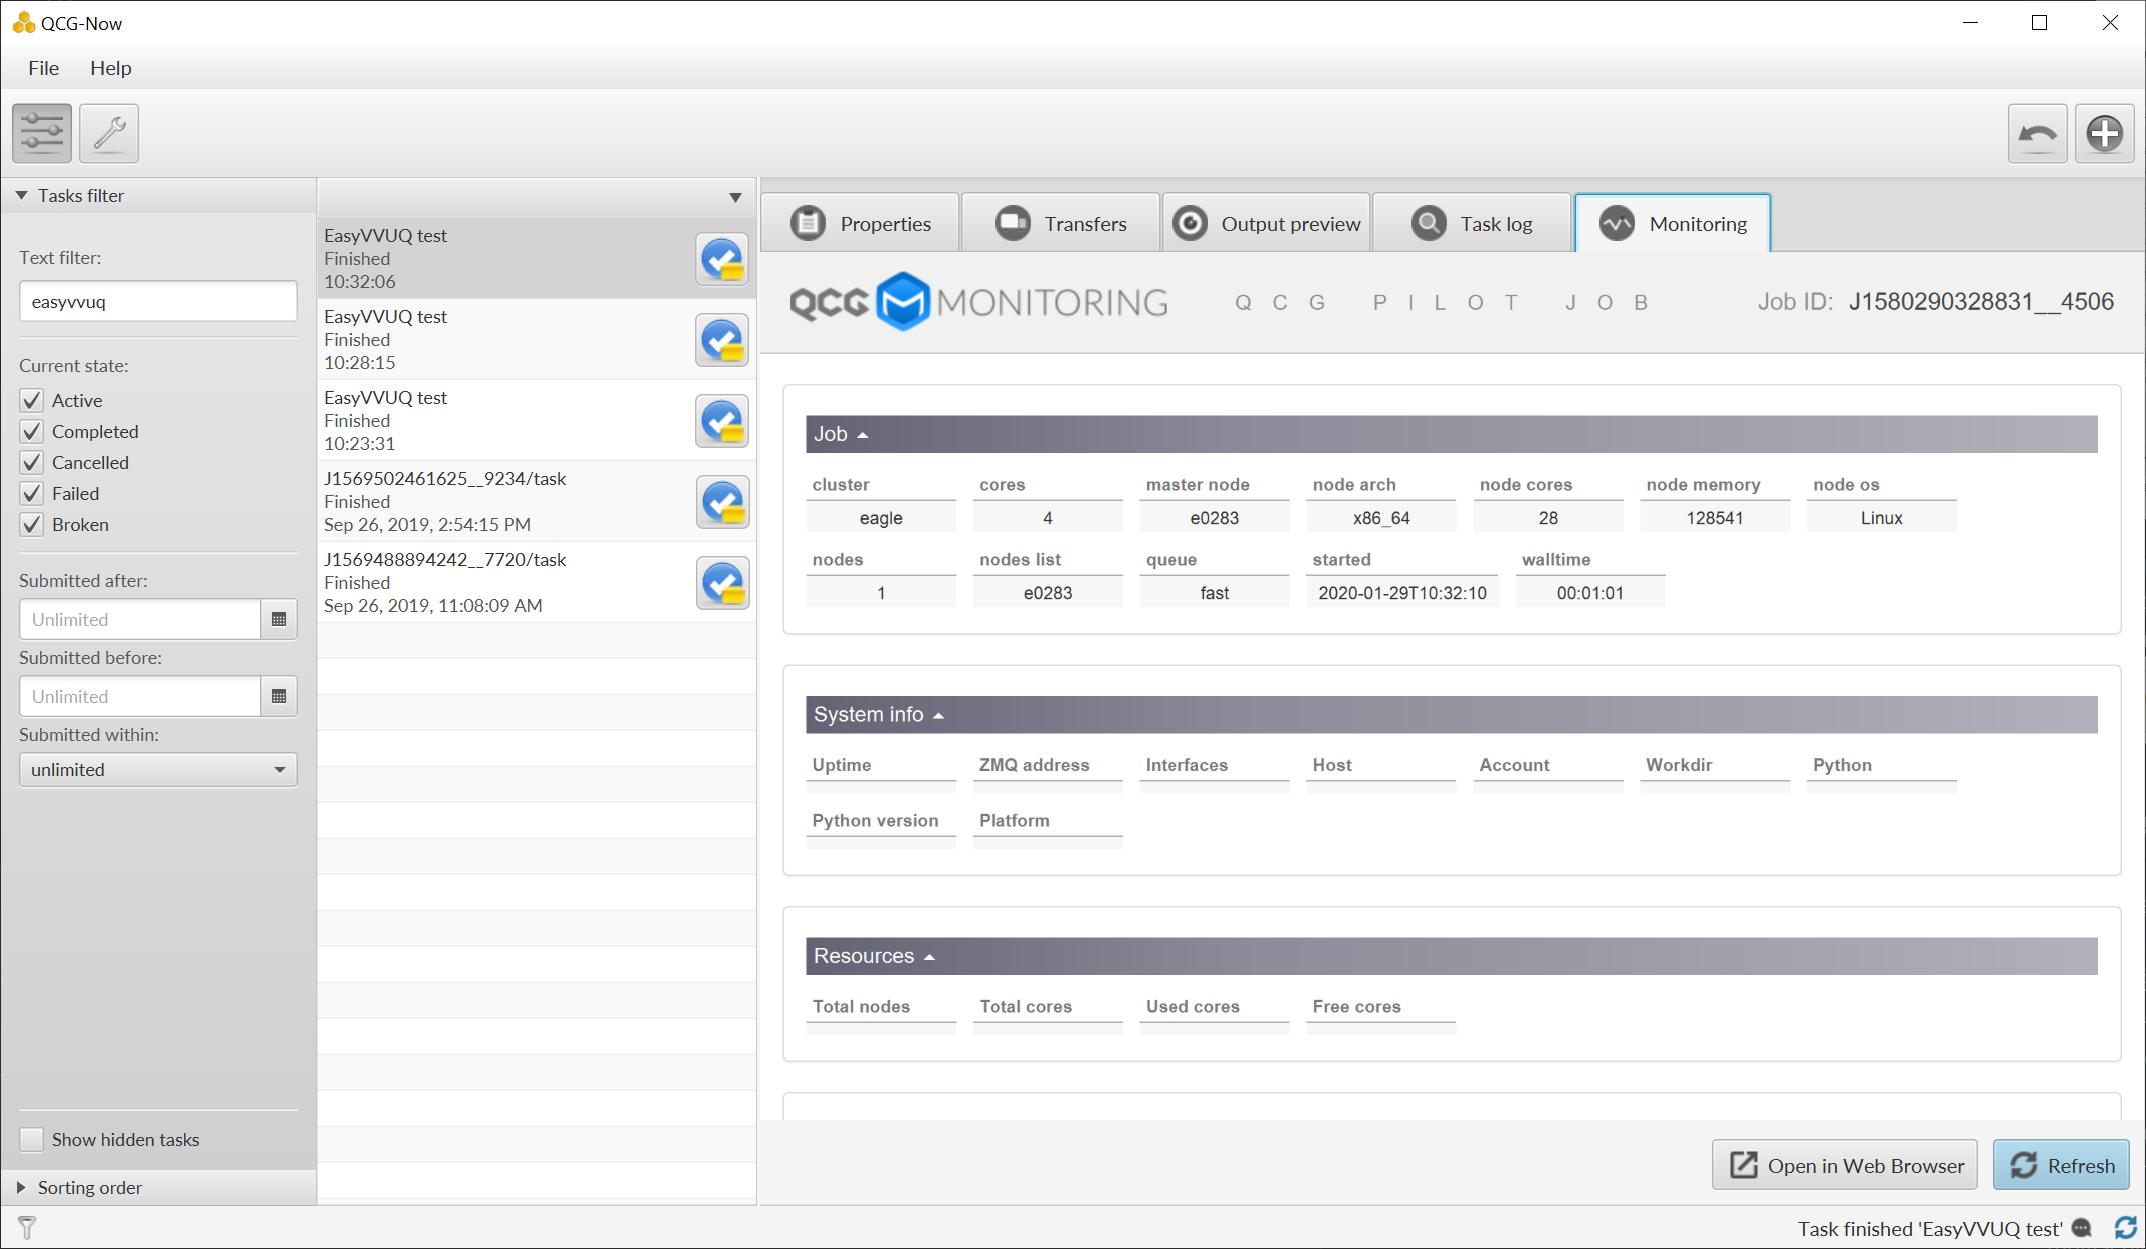
QCG-Monitoring (Experimental)
In order to provide users with the functionality of live monitoring of their tasks, QCG-Now has been experimentally integrated with the QCG-Monitoring solution. This integration allows to display basic data about the users tasks directly in QCG-Now. Currently, for the easyvvuq-qcgpj application the monitoring provides generic information about Pilot Job execution, but it will be tuned for specifics of EasyVVUQ in a near future.
In order to switch on the monitoring for a task, a user needs to enable
QCG-Monitoring portal in the Monitoring tab of the New Task
window: 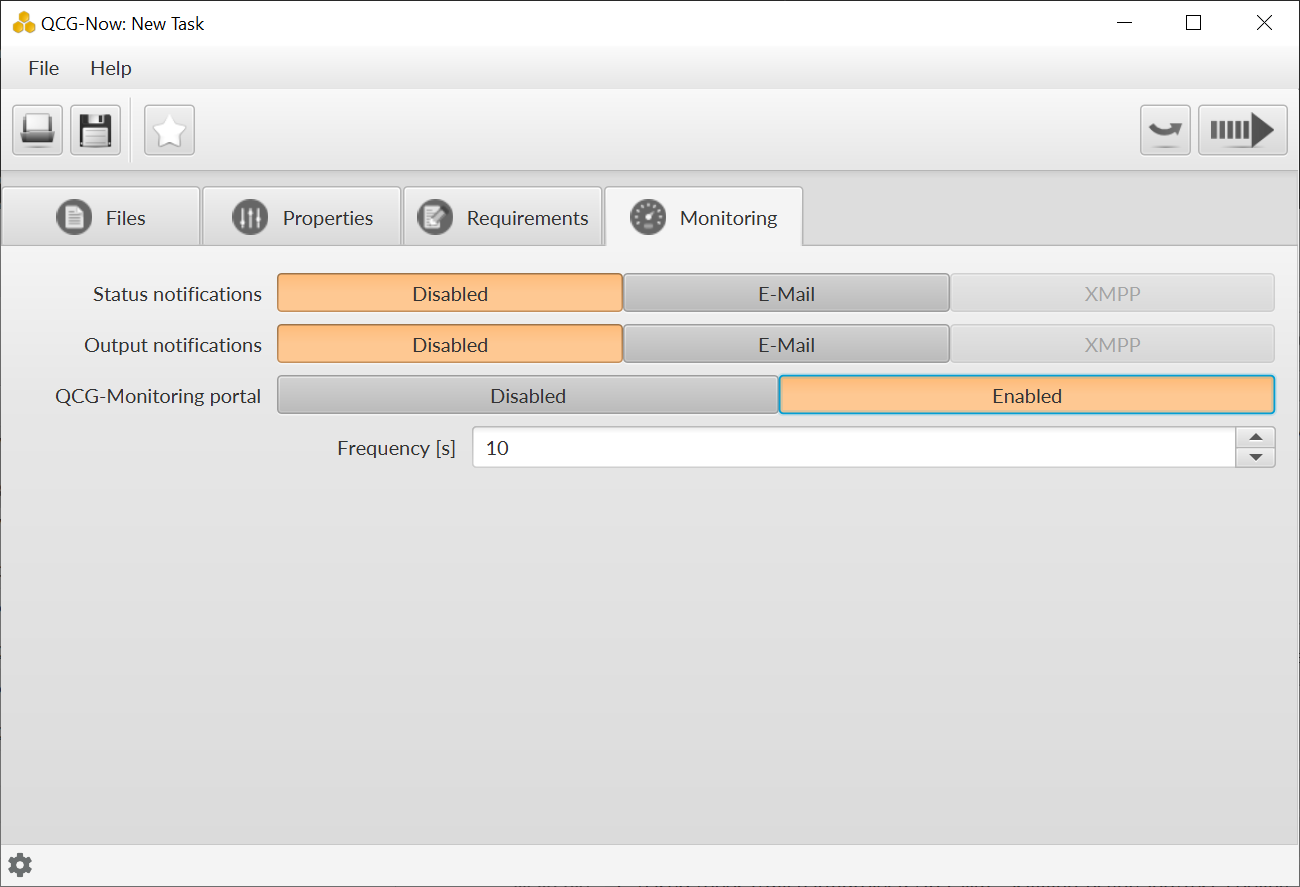
Once the easyvvuq-qcgpj application starts it is possible to use a
dedicated Monitoring tab of the Task’s Details view to display
monitored information: